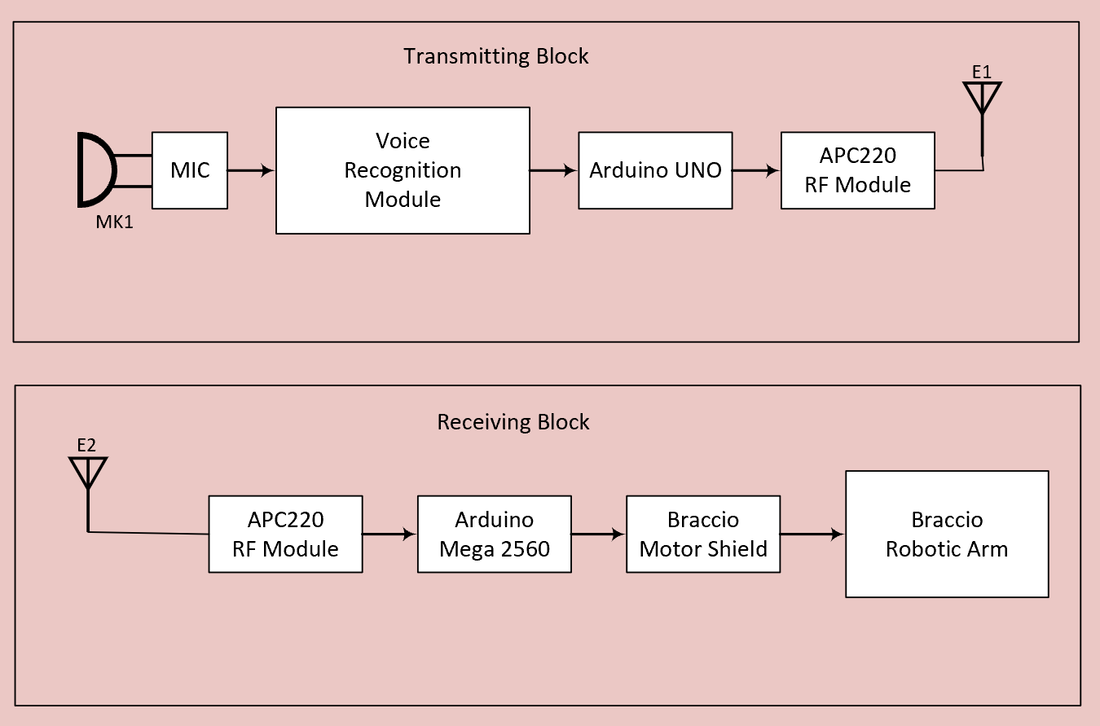
Voice Activated Robotic ArmIn this project, we will use the ELECHOUSE Voice Recognition Module to record 7 voice commands and then we will use these voice commands to tell Braccio Robotic Arm to perform few tasks. Here we will not discuss about the Braccio Robotic Arm details. This information can be obtained from the “Braccio Robotic Arm” section of this website.
Part one - Voice Recognition
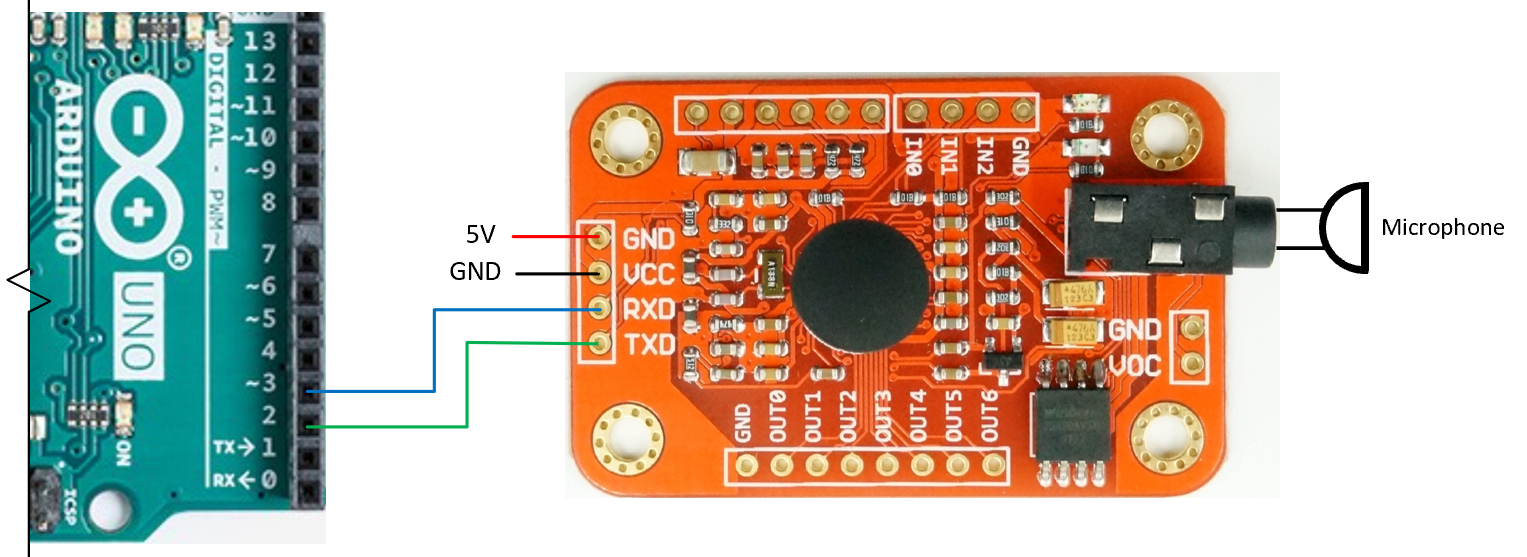
Elechouse Voice Recognition Module:
This VR module is a breakout PCB board that is designed to recognize pre-recorded voice commands. The user needs to train and upload voice commands to the VR module before it recognizes any command. According to the manufacturer, this voice recognition module is a speaker-dependent voice recognition module that supports up to 80 voice commands in all. However, only seven voice commands could work at the same time.
Now, start training the VR module by sending sigtrain command followed by indexNumber and signitureName. For example, send: sigtrain 0 (red light on the VR module will be illuminated for short time) .
Then, the serial monitor prints “Speak now”, say a word, something like “move”. The serial monitor will print “speak again”, you will need to repeat the same word again..."move". If you obtain “success”, these two recordings are match and "record 0" is trained. If not, repeat the command until you succeed. To train another voice, send sigtrain 1 . Let's say we want to record the word "Stop" command to train record 1 with signature "Stop". Repeat the above steps for all the seven signatures. Note: "Move" and "Stop" are used for demonstration purpose, you can use any meaningful word you choose. Continue training up to seven voices (index 0 to 6). Once the training is done, export these records to the recognizer using the "load" command followed by the indices. For example, to send all the above signatures, type "load 0 1 2 3 4 5 6 " , this will send all the seven records to the recognizer. To see all the available commands, type help ant any time and the serial monitor will print all the commands with their syntaxes. Voice Recognition V3 Module "train" sample.

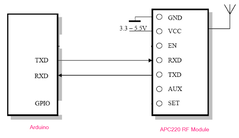
Now, connect the APC220 module to Arduino UNO as shown here.
- Connect the optional RGB LED light to Arduino.
RGB Arduino pwm pin (~) Red pin 3 Green pin 5 Blue pin 6 Note: I added the RGB indication for troubleshooting purpose only. This will help us validating the recoded voice recognition when a voice is generated.
Next, upload the code below onto Arduino Uno and change all the voice signatures into whatever signatures you trained and recorded. Do not forget to modify the "savedVoices()" function at the end of the code.
[Voice recognition code] /* - This code is a modified version of the Arduino example sketch
* - Receives voice command from the VR module
* - Indicator light turn on (optional)
* - Transmits serial data to the Robotic Arm thru the APC220 RF module
* - FYI: the voice signatures are written in Ethiopian language
* You can replace these voice signatures with yours
* - This project doesn't use the serial monitor and some of the serial print lines are commented out
* - Replace the signatures on "savedVoices()" function at the end of this code
* - RGB LED light can be omitted
*/
#include <SoftwareSerial.h>
#include "VoiceRecognitionV3.h"
VR myVR(11, 12); // 11:RX 12:TX, you can choose your favorite pins.
uint8_t records[7]; // save record
uint8_t buf[64];
//RGB light
int red = 3;
int green = 5;
int blue = 6;
// These are the voice signitures recorded in Amharic (Ethiopian language)
// Signiture (VR index)
#define Shero (0) // braccio's name
#define Tezegaje (1) // get ready
#define Anesa (2) // pick up
#define Wedkegne (3) // to the left
#define Wedgera (4) // to the right
#define Melese (5) // put it back
#define Beka (6) // Done
void setup()
{
/** initialize */
myVR.begin(9600); // serial com for the VR
/* APC220 is connected to RX/TX pins of the Arduino
* Disconnect the module before uploading code to Arduino
*/
Serial.begin(9600); // RF com with Braccio
// Serial.println("Elechouse Voice Recognition V3 Module\r\n Control LED sample");
pinMode(red, OUTPUT);
pinMode(green, OUTPUT);
pinMode(blue, OUTPUT);
led_all_color_test ();//lamp test
delay (500);
RGB_off ();
savedVoices(); // do not modify
}
void loop()
{
int ret;
ret = myVR.recognize(buf, 50);
if (ret > 0) {
switch (buf[1]) {
case Shero: // braccio's nick name
Serial.write('0'); // Send data over APC220
analogWrite(red, 255);
analogWrite(green, 0);
analogWrite(blue, 0);
delay (5000);
RGB_off ();
break;
case Tezegaje: //wede feet
Serial.write('1');
analogWrite(red, 0);
analogWrite(green, 255);
analogWrite(blue, 0);
delay (5000);
RGB_off ();
break;
case Anesa:
Serial.write('2');
analogWrite(red, 0);
analogWrite(green, 0);
analogWrite(blue, 255);
delay (5000);
RGB_off ();
break;
case Wedkegne:
Serial.write('3');
analogWrite(red, 0);
analogWrite(green, 255);
analogWrite(blue, 0);
delay (500);
analogWrite(red, 0);
analogWrite(green, 0);
analogWrite(blue, 255);
delay (1000);
RGB_off ();
break;
case Wedgera:
Serial.write('4');
analogWrite(red, 255);
analogWrite(green, 0);
analogWrite(blue, 0);
delay (500);
analogWrite(red, 0);
analogWrite(green, 255);
analogWrite(blue, 0);
delay (1000);
RGB_off ();
break;
case Melese:
Serial.write('5');
led_all_color_test ();
delay (200);
RGB_off ();
break;
case Beka: //
Serial.write('6');
for (int i = 10; i <= 100; i++)
{
analogWrite(green, i);
delay (50);
}
RGB_off ();
break;
default:
Serial.println("Record function undefined");
break;
}
/** voice recognized */
printVR(buf);
}
}
// FK functions
void led_all_color_test () {
//Red, bright
analogWrite(red, 255);
analogWrite(green, 0);
analogWrite(blue, 0);
delay(200);
// blue, bright
analogWrite(red, 0);
analogWrite(green, 0);
analogWrite(blue, 255);
delay(200);
//Green, bright
analogWrite(red, 0);
analogWrite(green, 255);
analogWrite(blue, 0);
delay(200);
// Cyan, bright
analogWrite(red, 0);
analogWrite(green, 255);
analogWrite(blue, 255);
delay(200);
// magenta, bright
analogWrite(red, 255);
analogWrite(green, 0);
analogWrite(blue, 255);
delay(200);
// Yellow, bright
analogWrite(red, 255);
analogWrite(green, 255);
analogWrite(blue, 0);
delay(200);
// white, bright
analogWrite(red, 255);
analogWrite(green, 255);
analogWrite(blue, 255);
delay(200);
}
void RGB_off () {
//Red, bright
analogWrite(red, 0);
analogWrite(green, 0);
analogWrite(blue, 0);
delay(200);
}
void RGB_white () {
//Red, bright
analogWrite(red, 255);
analogWrite(green, 255);
analogWrite(blue, 255);
delay(200);
}
//VR functions
void savedVoices() {
if (myVR.clear() == 0) {
Serial.println("Recognizer cleared.");
} else {
Serial.println("Not find VoiceRecognitionModule.");
Serial.println("Please check connection and restart Arduino.");
while (1);
}
// add instruction to print here
if (myVR.load((uint8_t)Shero) >= 0) {
Serial.println("Shero loaded");
}
if (myVR.load((uint8_t)Tezegaje) >= 0) {
Serial.println("Tezegaje loaded");
}
if (myVR.load((uint8_t)Anesa) >= 0) {
Serial.println("Anesa loaded");
}
if (myVR.load((uint8_t)Wedkegne) >= 0) {
Serial.println("Wedkegne loaded");
}
if (myVR.load((uint8_t)Wedgera) >= 0) {
Serial.println("Wedgera loaded");
}
if (myVR.load((uint8_t)Melese) >= 0) {
Serial.println("Melese loaded");
}
if (myVR.load((uint8_t)Beka) >= 0) {
Serial.println("Beka loaded");
}
}
//
void printSignature(uint8_t *buf, int len)
{
int i;
for (i = 0; i < len; i++) {
if (buf[i] > 0x19 && buf[i] < 0x7F) {
//Serial.write(buf[i]);
}
else {
// Serial.print("[");
// Serial.print(buf[i], HEX);
// Serial.print("]");
}
}
}
//
void printVR(uint8_t *buf)
{
//Serial.println("VR Index\tGroup\tRecordNum\tSignature");
//Serial.print(buf[2], DEC);
//Serial.print("\t\t");
if (buf[0] == 0xFF) {
//Serial.print("NONE");
}
else if (buf[0] & 0x80) {
//Serial.print("UG ");
//Serial.print(buf[0] & (~0x80), DEC);
}
else {
//Serial.print("SG ");
//Serial.print(buf[0], DEC);
}
//Serial.print("\t");
//Serial.print(buf[1], DEC);
//Serial.print("\t\t");
if (buf[3] > 0) {
printSignature(buf + 4, buf[3]);
}
else {
//Serial.print("NONE");
}
//Serial.println("\r\n");
}
Part two - Robotic Manipulator
This project uses the Braccio robotic arm to perform few tasks based on a received voice command. However, we will not discuss about the Braccio Robotic Arm. This information can be obtained from the “Braccio Robotic Arm” section of this website. Here, we will only utilize the 6-DOF (degree-of-freedom) advantage of the Braccio robotic arm and the voice recognition module.
Voice-activated Robotic Arm
Robotic Manipulator Code. /* Braccio Voice Activated from Arduino Uno
By FK Debebe, California State University
Robotic Arm movement on Ardunio Mega 2560
*/
#include <BraccioRobot.h>
#include <Servo.h>
Servo base; // M1=base degrees. Allowed values from 0 to 180 degrees
Servo shoulder; // M2=shoulder degrees. Allowed values from 15 to 165 degrees
Servo elbow; // M3=elbow degrees. Allowed values from 0 to 180 degrees
Servo wrist_rot; // M5=wrist rotation degrees. Allowed values from 0 to 180 degrees
Servo wrist_ver; // M4=wrist vertical degrees. Allowed values from 0 to 180 degrees
Servo gripper; // M6=gripper degrees. Allowed values from 10 to 73 degrees.
int data;
int buzzer = 4; // for both UNO and Mega 2560
int ledPin = 51; //only for Mega 2560
Position myInitialPosition(90, 45, 185, 0, 180, 70);
void setup() {
// Serial.begin(9600); // Serial monitor
Serial1.begin(9600); // voice Rcognition
pinMode(ledPin, OUTPUT);
pinMode(buzzer, OUTPUT);
InworkIndicator ();
BraccioRobot.init(myInitialPosition);// check this
delay (1000);
OffworkIndicator ();
Serial1.flush ();
delay (50);
}
Position pos;
void loop() {
// wait for voice command
delay(5);
if (Serial1.available() > 0)
{
data = Serial1.read(); // Read data received from UNO
Serial1.print (data);
if (data == '0') {
InworkIndicator ();
shero1 (); // Braccio's nick name
delay (1000);
OffworkIndicator ();
Serial1.flush();
}
if (data == '1') {
InworkIndicator ();
goHome2 ();
delay (2000);
tezegaje1 (); //get ready function call
delay (1000);
OffworkIndicator ();
Serial1.flush();
}
// Pick an object
if (data == '2') {
InworkIndicator ();
anesa (); // Pick an object function call
delay (1000);
OffworkIndicator ();
Serial1.flush();
}
if (data == '3') {
InworkIndicator ();
wedkegne1 (); // Move right function
delay (1000);
OffworkIndicator ();
Serial1.flush();
}
if (data == '4') {
InworkIndicator ();
wedgera1 (); // Move left function
delay (1000);
OffworkIndicator ();
Serial1.flush();
}
if (data == '5') {
InworkIndicator ();
melese1 (); // Put it back function
delay (1000);
OffworkIndicator ();
Serial1.flush();
}
if (data == '6') {
InworkIndicator ();
// beka1 ();
delay (1000);
endTaskSafePosition ();
delay (1000);
OffworkIndicator ();
Serial1.flush();
}
}
}
// ============ Functions ================================
void InworkIndicator () {
digitalWrite(ledPin, HIGH); // turn LED on
}
void OffworkIndicator () {
digitalWrite(ledPin, LOW); // turn LED on
}
void comCheck () {
tone(buzzer, 200); // Send 0.21KHz sound signal...
delay(500); // ...for half a sec
noTone(buzzer); // Stop sound...
delay(1500); // ...for 1.5 sec
}
void goHome () { // *** do not modify
// go home
BraccioRobot.moveToPosition(pos.set(90, 45, 185, 0, 180, 70), 50);
}
void goHome2 () { // *** do not modify
// go home2
BraccioRobot.moveToPosition(pos.set(90, 135, 0, 185, 180, 70), 50);
}
void endTaskSafePosition () { // *** do not modify
// go to a safe position for power off
BraccioRobot.moveToPosition(pos.set(90, 45, 185, 0, 180, 70), 50);
}
// voice control
void shero1 () {
// Yes
BraccioRobot.moveToPosition(pos.set(90, 45, 185, 45, 100, 20), 30);
delay (1000);
BraccioRobot.moveToPosition(pos.set(90, 45, 185, 0, 180, 70), 30);
delay (1000);
}
// get ready
void tezegaje1 () {
delay (1000);
BraccioRobot.moveToPosition(pos.set(90, 85, 80, 90, 178, 70), 30);
delay (1000);
}
//pick up
void anesa () {
delay (1000);
// go to the box
BraccioRobot.moveToPosition(pos.set(90, 90, 0, 0, 178, 10), 20);
delay (1000);
// pick the box
BraccioRobot.moveToPosition(pos.set(90, 90, 0, 0, 178, 50), 20);
delay (1000);
// lift
BraccioRobot.moveToPosition(pos.set(90, 85, 80, 90, 178, 50), 20);
delay (1000);
}
void wedgera1 () {
delay (2000);
BraccioRobot.moveToPosition(pos.set(10, 85, 80, 0, 178, 50), 20);
delay (1000);
}
void wedkegne1 () {
delay (2000);
BraccioRobot.moveToPosition(pos.set(178, 85, 80, 0, 178, 50), 20);
delay (1000);
}
void melese1 () {
delay (1000);
// go to the box
BraccioRobot.moveToPosition(pos.set(90, 90, 0, 0, 178, 50), 20);
delay (1000);
// drop the box
BraccioRobot.moveToPosition(pos.set(90, 90, 0, 0, 178, 10), 20);
delay (1000);
// clear
BraccioRobot.moveToPosition(pos.set(90, 90, 20, 20, 178, 10), 20);
delay (1000);
}
//
void Tegna1 () {
delay (2000);
BraccioRobot.moveToPosition(pos.set(90, 90, 12, 2, 90, 73), 20);
delay (2000);
}
void TakeAbox () {
// go to box
BraccioRobot.moveToPosition(pos.set(90, 90, 0, 0, 178, 10), 20);
delay (1000);
// pick the box
BraccioRobot.moveToPosition(pos.set(90, 90, 0, 0, 178, 50), 20);
// show the box
BraccioRobot.moveToPosition(pos.set(90, 90, 90, 90, 90, 50), 20);
// show to the right
BraccioRobot.moveToPosition(pos.set(0, 90, 90, 45, 90, 50), 20);
// show to the left
BraccioRobot.moveToPosition(pos.set(180, 90, 90, 45, 90, 50), 20);
// return to dropoff
BraccioRobot.moveToPosition(pos.set(90, 90, 0, 0, 178, 50), 20);
// drop the box
BraccioRobot.moveToPosition(pos.set(90, 95, 0, 0, 178, 10), 20);
delay (2000);
//
} |
|
|
|
|